BTS in Wausau, WI: Dated Yellow to Greige Hardwood Floor Stain Transformation
Posted by Aaron Schaalma

Who here likes to see a pretty cool transformation of a space?
I know I do!
This one we take a golden or yellow hardwood floor and blend it into a gray hickory hardwood floor, otherwise known as a cool trending greige color.
Go behind the scenes with me to see my step by step process to transform a rustic hickory floor (turned yellow) into a gray hickory hardwood floor.
Project At A Glance:
Location: Wausau, Wisconsin
The Challenge: Transform a hickory floor turned yellow by staining for a gray/beige (greige!) finish.
Original Floor: Rustic hickory hardwood floor of living room
Issue: Dated floor turned yellow due to oil polyurethane coating
Project Duration: 4 Days
Why Is The Floor Yellow?

You can see how these hickory floors have this golden or yellow hue to them.
The reason they are this color, isn’t from the fact that they were stained this color. It’s because they used oil polyurethane as the coating.
Oil polyurethanes don’t stay clear like most waterborne finishes do. They originally may look semi-transparent, but over time exposure to sunlight drastically changes its color.
Greige Stain 8 Step Process For Hickory Wood Flooring
Watch directly on Youtube or play the video here and follow the 8 steps below:
Step 1 - Sanding
We started to sand the floor and reveal how much the finish had really changed.

Now it's not as simple as just sand twice then you’re done.
There is a progression of grits that get used on floors.
Not every floor gets sanded the same, species, floor conditions, the color the floor is going and the products used on the floor all play a part in how the sanding process goes.
On this particular hickory floor we sanded it 5 times.
Choose Color Stains
Now what we like to do is have you pick out color tones ahead of time and then we apply a few different sample colors directly to your hardwood floors.
Here we put down 4 different sample colors on these hickory floors.

Once the client chooses the color they want, we sand the stain colors off the floor.
Then we do one final sanding on the floor prior to water popping the floor.
Step 2 - Water Popping
Water popping is where we apply water directly to the bare wood. What this does is opens up the grain of the wood consistently and allows for more uniform color and depth.
Once the water popped floor has dried we apply the stain choice that the client had choose.
Step 3 - Stain and Dry
After applying the stain we usually let the stain dry overnight. An overnight dry was especially important for this job because we did a UV cured finish.
You may ask why the finish makes a difference on how long to let stain sit and dry.
Here’s why.
When you cure UV finish it heats the floor up to 140-160 degrees.
If the stain isn’t totally dry what can happen is the gasses from the stain can heat up and get trapped under the coating of the floor. This creates a cloudy appearance throughout the floor.
One thing we do with this process is allow the stain to thoroughly dry and apply a seal coat over top of the stain.
Doing these 2 things locks in the stain and prevents it from emitting gasses under the finish.
Step 4 - Apply Sealer
Once the stain is dry(next day in most cases) we apply a sealer to the floor.
This manufacturer of the sealer we used recommends applying the first coat of finish directly over the sealer without abrading it.
Step 5 - First Application of UV Finish
After sealer application we apply one coat of UV finish, wait 3-4 hrs and come back and cure the finish.
Step 6 - Some Cleaning
The next day we do a slight abrading of the finish, do a thorough vacuuming of the floor and then trim.
Step 7 - Wet Tack
Then we wet tack the floor to remove small particles before applying the final coat of finish.
Step 8 - Final Finish and UV Curing
Finally, we apply the final coat of finish. Once that finish dries in 3-4 hrs we come back and cure the UV finish.
As soon as we were done the clients were able to move furniture back in the house.
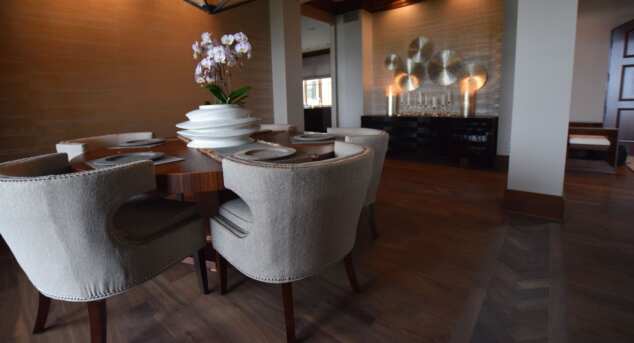
Conclusion and Final Results
The client that evening sent me this message:
“Picture of the space. I must say I absolutely love how the space turned out!"

This Wausau home now has what was once a hickory floor turned yellow and now beautiful living room with gray hickory flooring (or griege hickory flooring).

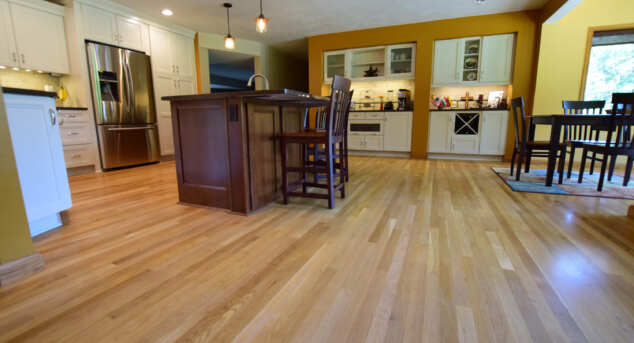
And here's the final result in the adjacent kitchen:

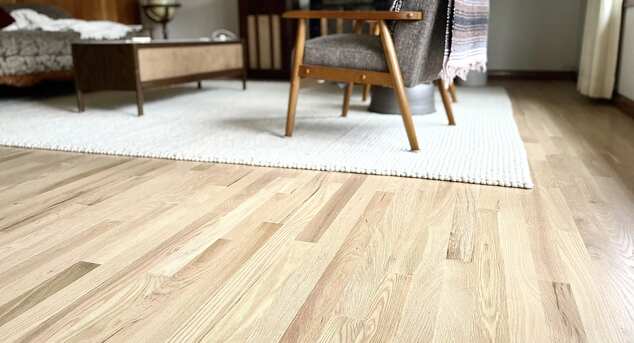
A third angle of both the living room and kitchen: